Are you tired of waiting for your regular nail polish to dry, only to find smudges and imperfections? In this guide, we delve into the fascinating world of nail care and ask the question: Can a Nail Lamp Dry Regular Polish? Join us as we explore the intricacies of nail drying, introduce the technology behind nail lamps, and provide you with a step-by-step guide to achieving flawless results. Whether you’re a nail care enthusiast or a beginner, discover the secrets that will revolutionize your manicure routine. Let’s embark on a journey to perfect nails!
Understanding the Basics of Regular Nail Polish Drying:
- Explanation of the Traditional Drying Process:
- Regular nail polish typically relies on air drying to set and harden.
- Polymers in the polish react with oxygen, creating a durable finish.
Key Points Details Drying Method Air drying Chemical Reaction Polymers in polish + oxygen Desired Outcome Formation of a hard, polished surface - Common Issues Faced During Air Drying:
- Smudging and Imprints:
- The risk of smudging increases during the extended drying period.
- Inconsistent Drying:
- Certain layers may dry faster than others, leading to uneven results.
- Vulnerability to Damage:
- Increased susceptibility to nicks and scratches during the drying process.
Common Issues Causes and Solutions Smudging and Imprints Avoid touching or use quick-dry solutions Inconsistent Drying Apply thin layers and allow adequate time Vulnerability to Damage Handle nails with care until fully dried - Smudging and Imprints:
Understanding the basics of how regular nail polish dries is crucial for identifying potential issues. The traditional air-drying process is not without its challenges, but armed with this knowledge, we can now explore alternative solutions for a flawless finish.
Introducing Nail Lamps and Their Technology:
- Overview of Nail Lamps and Their Role:
- Nail lamps are revolutionary tools in the nail care industry, designed to expedite and enhance the drying process.
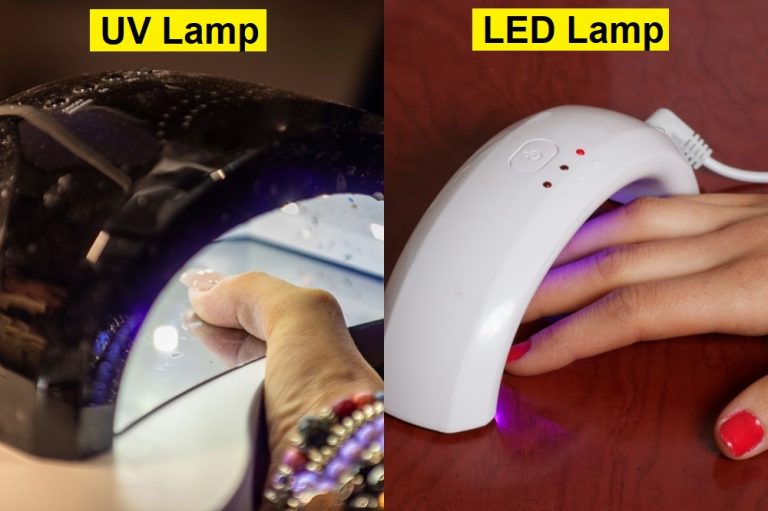
- They come in UV and LED variants, each offering unique benefits for efficient nail polish curing.
Key Features Benefits Accelerated Drying Time Cures polish faster than traditional methods Versatility Compatible with various types of nail polish Long-lasting Results Promotes durability and longevity of the manicure - How UV/LED Technology Works in the Drying Process:
- UV Technology:
- Emits ultraviolet light to initiate a chemical reaction in the polish.
- This reaction results in quicker drying and a hardened, glossy finish.
- LED Technology:
- Uses light-emitting diodes to produce specific wavelengths of light.
- Directs energy efficiently, curing the polish with minimal heat.
Technology Working Principle UV Technology Initiates chemical reaction for rapid drying LED Technology Efficiently directs energy for curing - UV Technology:
Understanding the role of nail lamps involves grasping the technology behind them. UV and LED technologies offer distinct advantages, making nail lamps a valuable asset in achieving professional-quality results at home. Now, let’s delve deeper into the compatibility of these lamps with regular nail polish.
The Compatibility Question: Regular Polish and Nail Lamps:
- Addressing Concerns about Using Nail Lamps with Regular Polish:
- Myth: Nail Lamps are Only for Gel Polish:
- Clarifying the misconception that nail lamps are exclusively for gel polish.
- Nail lamps can enhance the drying process for regular polish too.
- Potential Issues and Solutions:
- Exploring concerns such as texture changes or color alteration.
- Providing solutions to mitigate any adverse effects.
Concerns Clarification and Solutions Exclusivity to Gel Polish Nail lamps can be used for regular polish too Texture Changes Adjusting polish application for consistency Color Alteration Choosing appropriate lamp settings and polish - Myth: Nail Lamps are Only for Gel Polish:
- Factors Influencing Compatibility:
- Polish Composition:
- Discussing how the formulation of regular polish affects drying under UV/LED light.
- Lamp Specifications:
- Highlighting the importance of choosing the right lamp for specific polish types.
Factors Influence on Compatibility Polish Composition Determines responsiveness to curing light Lamp Specifications Ensures proper wavelength and intensity - Polish Composition:
Navigating the compatibility between regular polish and nail lamps involves dispelling myths and addressing potential concerns. By understanding the factors that influence compatibility, users can optimize their nail care routine for the best results. Now, let’s delve into the practical side with a step-by-step guide to using a nail lamp with regular polish.
Step-by-Step Guide for Drying Regular Polish with a Nail Lamp:
- Prepare Your Workspace:
- Set up a clean and well-lit area for optimal application.
- Ensure the nail lamp is plugged in and ready for use.
- Apply Regular Nail Polish:
- Use your preferred regular nail polish color.
- Apply thin, even coats to each nail, avoiding excess polish.
- Select the Right Lamp Setting:
- Consult the polish manufacturer’s recommendations for curing.
- Adjust the nail lamp to the appropriate UV or LED setting.
Nail Lamp Setting Polish Type UV Mode Traditional polish LED Mode Quick-dry or specialty polishes - Cure Each Layer:
- Place your nails under the lamp after applying each layer of polish.
- Follow the recommended curing time for your chosen polish.
Polish Layer Curing Time Base Coat As recommended by the polish manufacturer Color Coats Adjust according to polish specifications Top Coat Ensure a thorough cure for lasting results - Post-Curing Care:
- After the final layer, allow a brief cooling period.
- Apply cuticle oil or moisturizer to nourish the nails.
- Tips for Optimal Drying Results:
- Thin Layers Are Key:
- Apply polish in thin layers to ensure thorough curing.
- Follow Manufacturer Recommendations:
- Adhere to curing times and lamp settings specified by the polish brand.
- Maintain Cleanliness:
- Wipe off any sticky residue with a nail cleanser or rubbing alcohol.
- Thin Layers Are Key:
Following this step-by-step guide enhances the effectiveness of your nail lamp for regular polish. By incorporating these tips, you’ll achieve a flawless, salon-quality finish at home. Now, let’s explore the broader perspective by examining the pros and cons of using a nail lamp for regular polish.
Pros and Cons of Using a Nail Lamp for Regular Polish:
- Advantages of Using a Nail Lamp:
- Speed and Efficiency:
- Nail lamps significantly reduce drying time, providing a quick and efficient manicure experience.
- Long-lasting Results:
- Cured polish tends to be more durable and resistant to chipping or peeling.
- Versatility:
- Suitable for various types of regular nail polish formulations.
Advantages Impact on Nail Care Speed and Efficiency Quick, time-saving drying process Long-lasting Results Enhanced durability and wear Versatility Compatible with different polish types - Speed and Efficiency:
- Potential Drawbacks and Mitigation Strategies:
- Risk of Overheating:
- Mitigation: Avoid prolonged exposure; follow recommended curing times.
- Initial Investment:
- Mitigation: Consider it as a long-term investment in at-home nail care.
- Texture Changes or Color Alteration:
- Mitigation: Choose a lamp with adjustable settings and quality polishes.
Drawbacks Mitigation Strategies Risk of Overheating Adhere to recommended curing times Initial Investment Consider long-term benefits Texture Changes or Color Alteration Opt for adjustable settings and quality polishes - Risk of Overheating:
Understanding the pros and cons of using a nail lamp for regular polish empowers users to make informed decisions in their nail care routine. By capitalizing on the benefits and implementing mitigation strategies, individuals can enjoy the convenience and professional results of nail lamps while minimizing any potential drawbacks. This comprehensive guide concludes our exploration of the compatibility, usage, and considerations surrounding nail lamps and regular polish. Now, go ahead and elevate your at-home manicure experience!


