Acrylic nails have become a popular trend for those looking to add length and durability to their nails. However, when it comes time to remove them, it can be a difficult and time-consuming task. The right nail drill bit can make all the difference when removing acrylic nails. In this article, we will discuss how to choose the right nail drill bit to remove acrylic nails.
Types of Nail Drill Bits
Before discussing how to choose the right nail drill bit, it’s important to understand the different types of nail drill bits available.
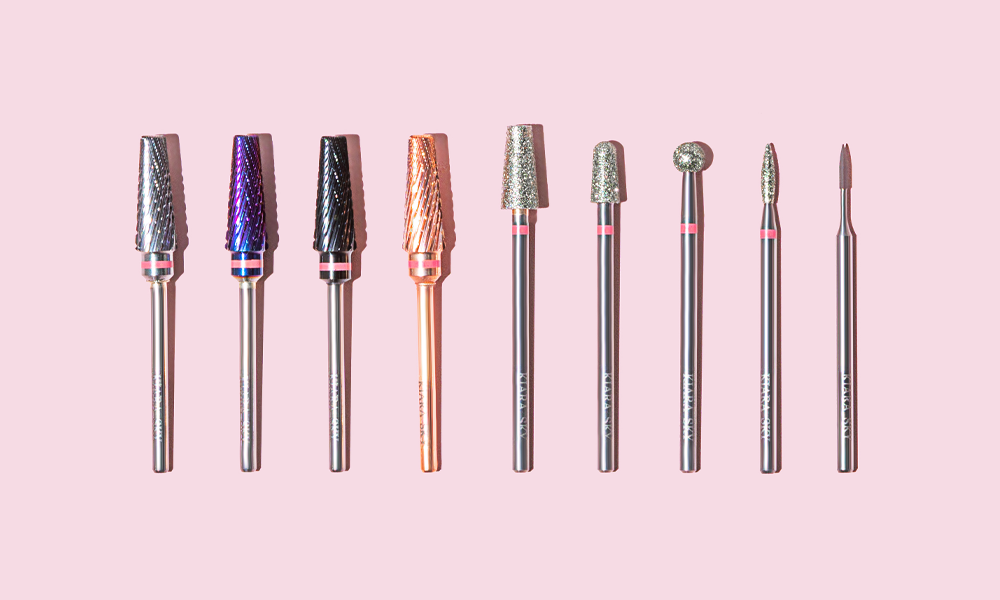
- Diamond Bits: These are made with tiny diamonds embedded in the bit. They are very durable and are great for removing acrylic nails.
- Carbide Bits: Carbide bits are made with carbide material and are known for their strength and durability. They are great for removing acrylic nails and other tough materials.
- Ceramic Bits: Ceramic bits are made with ceramic material and are known for their smoothness and gentle touch. They are great for natural nails and delicate work.
- Sanding Bands: Sanding bands are made of sandpaper and come in different grits. They are great for removing nail polish and smoothing out rough edges.
Choosing the Right Nail Drill Bit
Now that you know the different types of nail drill bits available, it’s time to choose the right one for removing acrylic nails. Here are some factors to consider when choosing a nail drill bit:
- Material: Make sure the nail drill bit you choose is made of high-quality material. Diamond and carbide bits are the best options for removing acrylic nails.
- Shape: The shape of the nail drill bit is also important. A tapered bit is great for removing bulk, while a barrel bit is good for shaping and smoothing.
- Size: The size of the nail drill bit depends on the size of the acrylic nail you are trying to remove. A larger bit is needed for thicker nails, while a smaller bit is needed for thinner nails.
- Grit: If you are using a sanding band, make sure you choose the right grit. A lower grit is good for removing nail polish, while a higher grit is good for smoothing.
Using the Nail Drill Bit
Now that you have chosen the right nail drill bit, it’s important to know how to use it properly. Here are some steps to follow:
- Prepare the Nail: Use a nail file to remove as much of the acrylic nail as possible before using the drill.
- Attach the Nail Drill Bit: Attach the nail drill bit to your drill according to the manufacturer’s instructions.
- Begin Drilling: Start drilling at a slow speed and gradually increase the speed as needed. Be careful not to apply too much pressure or hold the drill in one place for too long, as this can damage the natural nail.
- Clean the Nail: Once you have removed the acrylic nail, use a nail brush to clean the natural nail.
- Moisturize: Apply moisturizer or cuticle oil to the natural nail to prevent it from drying out.
Conclusion
Choosing the right nail drill bit is essential when removing acrylic nails. Diamond and carbide bits are the best options for removing acrylic nails, and the shape, size, and grit of the nail drill bit are important factors to consider. By following the steps outlined in this article, you can safely and effectively remove acrylic nails with a nail drill bit.
In conclusion, choosing the right nail drill bit can make a world of difference when it comes to removing acrylic nails. It’s important to consider factors such as material, shape, size, and grit when selecting a nail drill bit for this purpose. If you’re looking for high-quality nail drill bits or other professional nail products, be sure to check out IKS Beauty’s nail factory customization services. Our team of experts can work with you to create customized nail products tailored to your specific needs and preferences. With IKS Beauty, you can trust that you’re getting the best of the best when it comes to professional-grade nail products.


