If you’re a fan of gel manicures, you know that one of the downsides of this long-lasting nail polish is that it can be difficult to remove. Traditional nail polish removers often take a long time to dissolve gel polish, and soaking your nails in acetone can be harsh on your skin and nails. That’s where a nail drill bit can come in handy. In this article, we’ll show you how to safely and effectively remove gel polish with a nail drill bit, as well as some tips and tricks for achieving the best results.
What is a Nail Drill Bit?
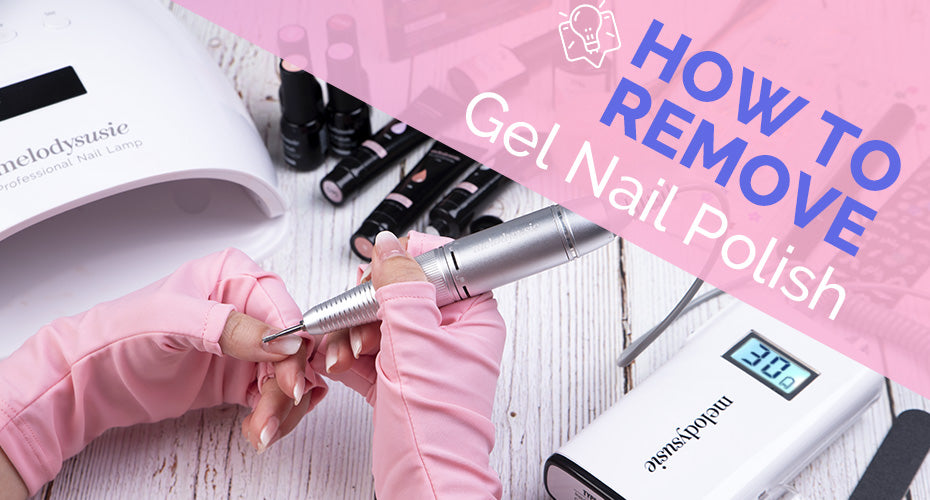
A nail drill bit is a small, rotating tool that can be used to shape, buff, and polish nails. It’s often used in nail salons to speed up the manicure process and create a smooth, even surface on the nails. When it comes to removing gel polish, a nail drill bit can be a useful tool for grinding away the layers of polish until it’s completely removed.
How to Remove Gel Polish with a Nail Drill Bit
Before you begin, make sure you have the right tools on hand. You’ll need a nail drill bit that’s specifically designed for removing gel polish, as well as a nail file or buffer, acetone, cotton pads or balls, and a base coat.
Step 1: Buff the Top Layer of Gel Polish
Start by using a nail file or buffer to gently buff the top layer of gel polish. This will help to break the seal and make it easier to remove the polish with the nail drill bit. Be careful not to buff too hard or too deep, as this can damage your nails.
Step 2: Apply Base Coat
Apply a base coat to your nails to protect them from the drill bit and minimize any damage. This will also help to moisturize and strengthen your nails, which can be helpful if they’re feeling weak or brittle.
Step 3: Use the Nail Drill Bit
Now it’s time to use the nail drill bit. Choose a bit that’s specifically designed for removing gel polish, such as a carbide bit or a diamond bit. These are strong and durable, and will be able to grind away the layers of polish without damaging your nails. Start by using the drill bit at a low speed, and gently work your way around each nail, being careful not to touch the skin or cuticles.
Step 4: Check Your Progress
After you’ve used the nail drill bit, check your progress. You should see that the gel polish has been significantly reduced or removed. If there are any remaining areas of polish, use a cotton pad or ball soaked in acetone to gently wipe away the remaining polish.
Step 5: Moisturize Your Nails
After you’ve removed the gel polish, it’s important to moisturize your nails to keep them healthy and strong. Apply a cuticle oil or hand cream to your nails and massage it in gently.
Tips and Tricks for Using a Nail Drill Bit
- Always use a nail drill bit that’s specifically designed for removing gel polish, and choose a strong and durable bit like a carbide or diamond bit.
- Start at a low speed and work your way up as needed.
- Be gentle and careful when using the nail drill bit, and avoid touching the skin or cuticles.
- Use a base coat to protect your nails and minimize any damage.
- Moisturize your nails after you’ve removed the polish to keep them healthy and strong.
Using Iksbeauty Nail Products and Customized Nail Drills
If you want to achieve the best results when using a nail drill bit to remove gel polish, consider using high-quality nail products from Iksbeauty. Their products are specially designed to help you achieve a perfect at-home manicure, and their customized nail drills are perfect for removing gel polish.
Iksbeauty offers a range of nail products, including base coats, top coats, cuticle oils, and hand creams. These products are made with high-quality ingredients that nourish and protect your nails, keeping them healthy and strong. They also offer customized nail drills that are designed specifically for removing gel polish. These drills are made with durable materials and feature a range of speeds and attachments to help you achieve the best results.
To use an Iksbeauty nail drill, simply follow the same steps outlined above for using a nail drill bit to remove gel polish. Apply a base coat, use the nail drill to remove the polish, and moisturize your nails afterwards. With the help of an Iksbeauty nail drill and their high-quality nail products, you’ll be able to achieve a flawless at-home manicure that lasts.
Conclusion
Removing gel polish can be a time-consuming and frustrating process, but with the help of a nail drill bit, it doesn’t have to be. By following the steps outlined in this article and using the right tools and products, you can safely and effectively remove gel polish and achieve a flawless at-home manicure. Remember to be gentle and careful when using the nail drill bit, and always choose high-quality nail products like those offered by Iksbeauty. With these tips and tricks, you’ll be able to say goodbye to stubborn gel polish and hello to healthy, beautiful nails.


